Monday, July 30, 2012

How to: loose waves using a 3 barrel waver.


Hey guys, today i'll show you how to create loose waves using a 3 barrel curler (as seen above) . I'll also show you a cute hairstyle to do with the waves at the end. So just keep on reading :)
I'm also making this because I searched ALL over youtube and could not find a tutorial on using the 3 barrel waver on short hair. So I hope I explained good enough :)


What you will need:
    Hairspray ( I use Aussie)
    Teasing comb
    Hair clip
    3 barrel curler (I'm using Revlons)
    I also used Chi silk infusion


Step ONE: If you are using any silkening gloss; this is the time to do so. You will apply this ONLY to your ends.


Step TWO: You then will teast the top of your hair (this will make your waves have more volume at the root.

 1. Lift up a small section of hair
 2. Spray hairspray at roots
 4. Using a teasing comb; start at middle of your hair and comb downwards.

 Keep doing this until you get desired volume. (it should look this crazy :p)

5. Lightly comb down the crazyness and it should look something like this.


Step THREE: Now you need to section off the bottom of your hair.


Step FOUR: Now it's time to start waving your hair!!

1. Grab small section of hair and clamp the waver down as close to the root as possible.
 2. Next you will place the top barrel on the last curve. (this will make the waves continuous)
 3. It will look like this when you're done.
 You will keep doing this and letting down layers of your hair until you have finished every piece. It should look like this. ** Doing your bangs is OPTIONAL.


Step FIVE: You will then take your fingers and shake your hair to break apart the sections.

It should look like this in the end. Make sure to spray hairspray!!!!!

You can leave your hair down or you can continue to the next step for a cute hairstyle :)


All you need to do is split your bangs down the middle; take one side, twist it and pin it down. Repeat on other side.

 And this is the result look!!

I hope you guys enjoyed this tutorial :)


Thursday, July 26, 2012

How to: Minnie mouse nails

Hey guys; this is my very first nail tutorial (yay). Since I'm wide awake at 12:00 A.M, i'll show you how to create a Minnie Mouse inspired nail (I did come up with this myself, so give me credit if you use it) as seen above. It's very simple and anyone is able to do it (If I can; you can too). So lets get started!!

You will need:
Vaseline
Nail polish remover
Q-tip
Tooth picks

Nail polish:
    Red (I used Revlons Scarlet curtain)
    White (I used Sinful colors)
    Black (I used Sinful colors)
    Clear top coat (Sally Hansen hard as nail)


Step ONE: Make sure your nails are clean from any polish, cut, filed, and cuticles pushed back.

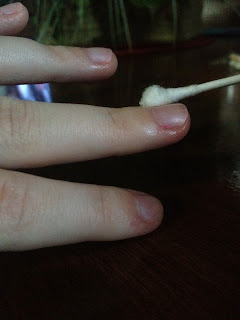
Step TWO: With a Q-tip apply vaseline on the skin around the nail. (this will make cleaning up WAY easier)
                                                       (ignore my horrible looking nails)

Step THREE: Apply your red nail polish on every nail. (Use at least 2 coats)

Step FOUR: You will then take a tooth pick and dip it into your white nail polish. Make sure you do not have too much on the tooth pick so you do not create a "pool" of polish on your nail (this will make it messy and will take very long to dry). However; make sure you have enough on the tooth pick so you can drop dots easily.  **Look at picture below to see how to do this!!!


Step FIVE: You're almost done :)
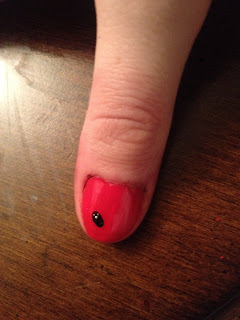
                     Now it's time to make Minnie Mouses sillhoutte. I did this on my thumb, as there is more room.
  1. You will start by dipping your tooth pick into the black polish and making a small ear "dot" on the bottom of the nail towards the left side of your nail. ** see picture before you do this!!!


     2.  You will then make the other ear next to the first one. **see picture!!

    3. Now it's time to create her head. Place a dot on the bottom of your nail centered between the two ears. You will then use your tooth pick to connect the head to the bottom of the ears. **see picture!!

   (You might mess up once or twice, but keep trying utnil you get it the way you want. I had to take all my polish off over 3 times to redo it before I got it the way I wanted; so don't feel discouraged.)                                                          

Step SIX: After your polish has completely dried; apply a thin layer of clear coat to finish it off.

Step SEVEN: This is where the Vaseline comes in handy. Using a Q-tip, start to remove the excess polish off of your skin and it should come right off. If it is not coming off easily; dip a Q-tip in polish remover and gently scrub it off. (make sure you do not go too close to the nail, as you don't want to remove any polish from the sides)


Hooray, we now have cute little Minnie Mouse nails!! I hope you guys enjoyed this tutorial and had fun doing this. Just leave a comment if you have any questions. Have a great day :)


Wednesday, July 25, 2012

3 reviews: smashbox photo finish primer, make up forever HD foundation, make up forever HD powder

Hey guys! Today i'll be reviewing three products that I have been using for over a month; so I figured I have a good enough insight on how well these products work.

Product ONE: smashbox photo finish foundation primer

     I'll start by saying this is my ALL TIME FAVORITE  primer I have ever used. I purchased this mini tube for 10$ during Christmas and have been using it since then; EVERY day. This product lasts so long, as you can barely tell i've used any. All you need is a small amount (which applies really well) and it will do its job. It gives you the perfect canvas to apply your foundation and it leaves your face feeling silky smooth. I have noticed that it also keeps my face from getting oily throughout the day; not to mention, it makes your foundation stick on ALL day. I swear by this stuff and i'll be using it for a VERY long time.

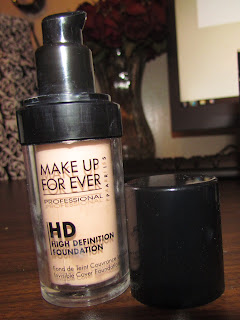
Product TWO: Make up forever HD foundation

      This foundation is really good, but not the BEST. I purchased it for around 40$ and I got shade 110 which is named Pink porcelain. This is the lightest shade they carry; which I was highly dissapointed with. I have absolutely NO pink undertone; so this makes me look a little on the orangey side. Sadly the next color was WAY too dark for my pale skin. This foundation would work great for people with pink undertones. As for how it works: It works well. The coverage is medium (as I have freckles and they show through a little) ; so I do NOT reccomend this to anyone who has things they need to hide. (unless you're fine with applying more than one layer) It goes on really well and spreads out evenly. It does not dry up quickly like most liquid foundations; so you can take your time to work it in. It does have a pump; which is a HUGE plus. As for the finish, it is NOT matte; it looks dewy. (I like this also because your skin looks refreshed and bright) The bottle does last pretty long; as i've been using it for over a 6 month span. Soooo, to come to a conclusion (sorry for making this so long), It is a great foundation. The ONLY down side is the pink undertone, the limited shades for pale skin, and the coverage is NOT full.


Product THREE: Make up forever HD powder


    This product is a MUST with the make up forever HD foundation. I purchased this mini one for
15$ and it has not let me down. I've been using it for the same amount of time as the foundation and I am just running out. This product is applied so easily; all you need is a fluffy brush, swirl tap and buff it right in. (make sure you don't use TOO much, you only need a TINY amount.) It really puts your make-up in place so it does not rub off or "melt" off. The good thing is that you don't have to chose from shades; as it works for EVERYone. This is the finishing touch to your make-up and I HIGHLY reccomend it to anyone. (It also brightens your face) The only downside is the packaging; as there is just a huge hole for you to take the product out from, which causes a huge mess (as seen in the picture).
**NOTE: The HD foundation and powder was created to be used on camera; and believe me, it looks AMAZING on camera. So I reccomed this is you are wearing it where a lot of pictures are going to be taken of you.


That's it for this post. I hope it helped you a little and gave you an insight on these products. Have a great day!! :)


Tuesday, July 24, 2012

How to: winged eye-liner


Hooray for my very first blog/tutorial!!!!!!!

Hi all, lets start this week with a step-by-step guide (with pictures) on how to create a the winged eye look.

What I used (you do not have to use the exact brands I use; although I do recommend them.)
  • White eye shadow (Mineral effects)
  • Black liquid eye pen (Revlon Colorstay)
  • Eye liner pencil (name is washed off, but you can use any kind you have)
  • Mascara in black (Organic wear from Physicians formula)
  • Cream eyeliner in black (e.l.f) make sure you use a cream eyeliner brush!
  • I will not add a list of brushes, as most people use what brushes they prefer

WARNING: My eyebrows are HORRIBLE! Please ignore!


Step ONE:
 

       Add white eye shadow to the whole eyelid


Step TWO:


     Take your liquid eye pen and start from the center to your eye and end at the outer corner of your eye.
 
(Excuse my crooked line :p)
Try making your line as straight as possible; unlike mine.


Step THREE:

      You will then start from the inner corner of your eye and connect your line to the center.
Step FOUR:

      Make a LITTLE flick up from the end of your eye liner (outer corner); it should point to the end of your eyebrow! Do NOT make the line go straight to the side. (You can make this flick however long you want)

Step FIVE:

      Start from the outer end of your "FLICK" and connect it back to your liner. (Basically; make a triangle.)

                         (I am aware that my "triangle" looks messed up; it'll look better in the end.)


Step SIX:

       Fill in the triangle.


                                        (It should look similar to this when your eye is open)
  I know I totally forgot to take a picture with my eye closed. But you get the point without               the picture.


Step SEVEN:

       Lift up your eye lid using your finger and line your upper water line with your pencil eyeliner.


                                                   (This will make your lashes look fuller)
                                                             CRAZY looking eyeball :p

Step EIGHT:

       Apply your mascara to your upper lashes; also lower if you like. (3 coats should do the job)


Step NINE:

       Using your cream eyeliner, line your lower water line.
           ( We all know how to do this; no picture needed)


TADA; you have yourself a winged eye!!!!


I really hope you guys enjoyed this tutorial. It is my first one; so it's not the best. (Cut me some slack) If you have any questions you can comment below; also tell me what other tutorials/blogs you'd like me to do.

Have a great day!! :)